1.准备工作
实例已分配公网IP地址或绑定弹性公网IP(EIP)。
操作系统必须为CentOS 7.x。
实例安全组的入方向规则已放行22、80、443端口。
2.环境说明
Apache版本:Apache 2.4.6
MySQL版本:MySQL 5.7.31
PHP版本:PHP 7.3.33
3 Nginx安装
# 安装Nginx
yum -y install nginx

# 查看版本
nginx -v

返回结果如下所示,表示Nginx安装成功。
nginx version: nginx/1.20.1
4 安装MySQL
# 更新YUM源
rpm -Uvh  http://dev.mysql.com/get/mysql57-community-release-el7-9.noarch.rpm

# 安装MySQL
yum -y install mysql-community-server --nogpgcheck

# 查看MySQL版本号
mysql -V

返回结果如下所示,表示MySQL安装成功。
mysql  Ver 14.14 Distrib 5.7.36, for Linux (x86_64) using  EditLine wrapper

# 启动MySQL
systemctl start mysqld

# 设置开机启动MySQL
systemctl enable mysqld
systemctl daemon-reload
5 安装PHP
# 安装 EPEL源
yum install -y epel-release
# 安装REMI源
yum install -y http://rpms.remirepo.net/enterprise/remi-release-7.rpm
# 安装Yum源管理工具
yum -y install yum-utils
# 安装PHP7.3及扩展
yum install -y php73-php-devel php73-php-fpm php73-php-cli php73-php-bcmath php73-php-gd php73-php-json php73-php-mbstring php73-php-mcrypt php73-php-mysqlnd php73-php-opcache php73-php-pdo php73-php-pecl-crypto php73-php-pecl-mcrypt php73-php-pecl-geoip php73-php-recode php73-php-snmp php73-php-soap php73-php-xml php73-php-zip php73-php-xml* php73-php-phpiredis php73-php-pecl-redis5.x86_64
# 查看PHP版本
php73 -v 安装成功的结果如下:PHP 7.3.33 (cli) (built: Aug 1 2023 13:16:28) ( NTS )
# 设置开机启动
Copyright (c) 1997-2018 The PHP Group
Zend Engine v3.3.33, Copyright (c) 1998-2018 Zend Technologies
with Zend OPcache v7.3.33, Copyright (c) 1999-2018, by Zend Technologies
systemctl start php73-php-fpm
systemctl enable php73-php-fpm
PHP7.3常用操作命令
php73 -v # 查看版本
systemctl enable php73-php-fpm # 开启开机自启
systemctl restart php73-php-fpm # 重启
systemctl start php73-php-fpm # 启动
systemctl stop php73-php-fpm # 关闭
systemctl status php73-php-fpm # 检查状态
# 查找php.ini文件位置
find /etc/opt/remi/php73 -name php.ini# 打开php.ini文件,然后将下面各项的值修改为如下
vim /etc/opt/remi/php73/php.ini
修改后的内容如下
memory_limit = 512M
post_max_size = 512M
upload_max_filesize = 100M
max_execution_time = 300
max_input_time = 300
date.timezone = Asia/Shanghai
max_input_vars = 10000
# 修改用户和用户组,如果运行的是 nginx服务器,则将/etc/opt/remi/php73/php-fpm.d/www.conf文件中的user和group项的值改为nginx;如果运行的是 apache服务器,则将/etc/opt/remi/php73/php-fpm.d/www.conf文件中的user和group项的值改为apache;
vim /etc/opt/remi/php73/php-fpm.d/www.conf
# 修改【/var/opt/remi/php73/lib/php】目录的用户和用户组
cd /var/opt/remi/php73/lib/php/
chown nginx:nginx *
# php73链接到系统环境变量中,就可以使用 php -v
ln -s /opt/remi/php73/root/usr/bin/php /usr/bin/php
常用的其他操作命令
rpm -qa | grep 'php' // 查找php和扩展的安装包
rpm -ql php73-php-pecl-swoole4-4.4.15-1.el7.remi.x86_64 // 查看指定包的安装路径
yum search php73 // 查看PHP73的拓展
yum update
# 将 /etc/opt/remi/php73/php.ini中cgi.fix_pathinfo 项的值,设置为 1
sed -i 's/;cgi.fix_pathinfo=0/cgi.fix_pathinfo=1/' /etc/opt/remi/php73/php.ini
# 重启PHP
systemctl restart php73-php-fpm
6 配置Nginx
(1) 备份Nginx配置文件
cp /etc/nginx/nginx.conf /etc/nginx/nginx.conf.bak(2) 修改Nginx配置文件,添加Nginx对PHP的支持
# 1) 打开Nginx配置文件
vim /etc/nginx/nginx.conf

# 2) 按i进入编辑模式,然后在server大括号内,修改【location /】处的配置信息为如下:
location / {
	index index.php index.html index.htm;
}

# 3) 修改【location ~ .php$】处的配置信息如下:配置Nginx通过fastcgi方式处理您的PHP请求。
location ~ .php$ {
   #将/usr/share/nginx/html替换为您的网站根目录,本文使用/usr/share/nginx/html作为网站根目录。
   root /usr/share/nginx/html;
   #Nginx通过本机的9000端口将PHP请求转发给PHP-FPM进行处理。
   fastcgi_pass 127.0.0.1:9000;
   fastcgi_index index.php;
   fastcgi_param  SCRIPT_FILENAME  $document_root$fastcgi_script_name;
   #Nginx调用fastcgi接口处理PHP请求。
   include fastcgi_params;
}

# 4)修改后的配置文件内容如下图所示,接着按下Esc键后,输入:wq并回车以保存关闭配置文件。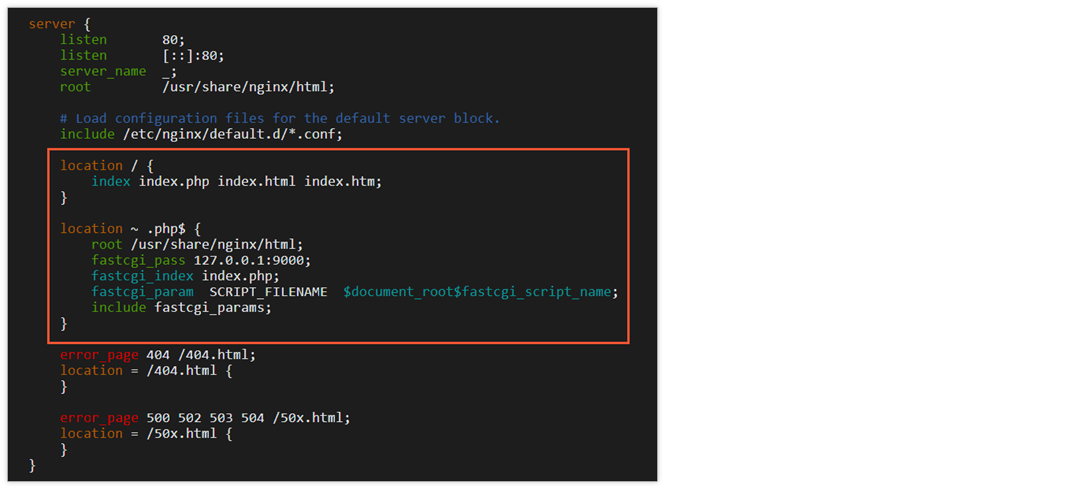
(3) 启动Nginx服务
systemctl start nginx(4) 设置Nginx服务开机自启动
systemctl enable nginx7 配置MySQL
(1) 查看MySQL的初始密码
grep 'temporary password' /var/log/mysqld.log

#返回结果示例如下,本示例中初始密码为ARQTRy3+n8*W
2021-11-10T07:01:26.595215Z 1 [Note] A temporary password is generated for root@localhost: ARQTRy3+n8*W
(2) 配置MySQL的安全性
mysql_secure_installation

# 1).重置root账号的密码。
Enter password for user root: #输入上一步获取的root用户初始密码。

The existing password for the user account root has expired. Please set a new password.

New password: #输入新密码,长度为8至30个字符,必须同时包含大小写英文字母、数字和特殊符号。特殊符号可以是()` ~!@#$%^&*-+=|{}[]:;‘<>,.?/

Re-enter new password: #重复输入新密码。
The 'validate_password' plugin is installed on the server.
The subsequent steps will run with the existing configuration
of the plugin.
Using existing password for root.

Estimated strength of the password: 100
Change the password for root ? ((Press y|Y for Yes, any other key for No) :Y #按Y,并再次输入上步已设置的密码。

New password: #再次输入新密码。

Re-enter new password: #重复输入新密码。

Estimated strength of the password: 100
Do you wish to continue with the password provided?(Press y|Y for Yes, any other key for No) :Y #按Y使用新密码。

# 2).输入Y删除匿名用户账号。
By default, a MySQL installation has an anonymous user,
allowing anyone to log into MySQL without having to have
a user account created for them. This is intended only for
testing, and to make the installation go a bit smoother.
You should remove them before moving into a production
environment.

Remove anonymous users? (Press y|Y for Yes, any other key for No) : Y  #是否删除匿名用户,输入Y
Success.

# 3).输入Y禁止root账号远程登录。
Normally, root should only be allowed to connect from
'localhost'. This ensures that someone cannot guess at
the root password from the network.

Disallow root login remotely? (Press y|Y for Yes, any other key for No) : Y #禁止root远程登录,输入Y
Success.

# 4).输入Y删除test库以及对test库的访问权限。
By default, MySQL comes with a database named 'test' that
anyone can access. This is also intended only for testing,
and should be removed before moving into a production
environment.

Remove test database and access to it? (Press y|Y for Yes, any other key for No) : Y #是否删除test库和对它的访问权限,输入Y
 - Dropping test database...
Success.

 - Removing privileges on test database...
Success.

# 5).输入Y重新加载授权表。
Reloading the privilege tables will ensure that all changes
made so far will take effect immediately.

Reload privilege tables now? (Press y|Y for Yes, any other key for No) : Y #是否重新加载授权表,输入Y
Success.

All done!
8 配置PHP
# 新建并编辑phpinfo.php文件
# 本案例的网站根目录为/usr/share/nginx/html
echo "<?php phpinfo(); ?>" > /usr/share/nginx/html/phpinfo.php

# 启动PHP-FPM
systemctl start php73-php-fpm

# 设置PHP-FPM开机自启动
systemctl enable php73-php-fpm
浏览器访问 http://<ECS实例公网IP地址>/phpinfo.php,得到的操作结果如下: